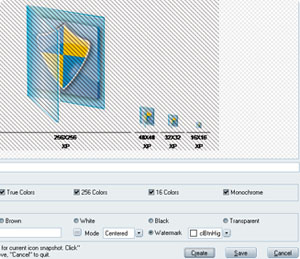
A snapshot is an image created to show one icon in several formats on a background. To create a snapshot of an opened icon, choose Edit-> Create Icon Snapshot when an icon is opened in editing area, a dialog box Create Icon Snapshot opens, you can set parameters there, and then click "Create" button to create snapshot image and "Save" button to save it.
In addition, you can use Watermark as a special sign for your image to reserve copyright. Select Watermark first, set color and finally click “Create” button.

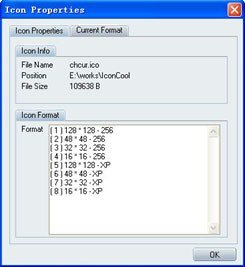
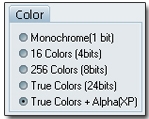
To choose Edit-->Icon Properties or press F5 , the current icon properties will be shown in the dialog box.
PNG Compressed Image
Format (Windows Vista)
To PNG compressed an existing icon, please first open the icon in editor area, then choose Eidt-> PNG Compressed Image Format (Windows Vista/7/8) option. A small ZIP symbol will be displayed on the upper-right corner of the selected icon. That means the current icon format is PNG compressed format for Windows Vista/7/8. Then click Save to complete it.
Tools Menu
About tools and the toolbox
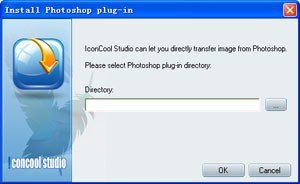
The first time you start the application, the toolbox appears on the left side of the screen. You can show or hide the toolbox by choosing View > Toolbox. You can draw, select, move, paint and edit image by using some tools in the toolbox. Other tools allow you to change foreground/background colors, adjust opacity of foreground/background colors and transfer current icon to Adobe Photoshop directly. You can expand some tools to show hidden tools beneath them. A small triangle at the lower right corner of the tool icon signals the presence of hidden tools. You can also view information about any tool by positioning the pointer over it. The name of the tool appears in a tool tip below the pointer.
To use a tool, click a tool in the toolbox. If there is a small triangle at a tool’s lower right corner, hold down the mouse button for 1 sec to view the hidden tools. Then click the tool you want to select.
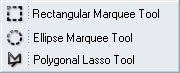
The Marquee tools include Rectangular Marquee Tool, Elliptical Marquee Tool and Polygonal Lasso Tool. You can switch different marquee tools at will via pressing the Marquee tools for 1 sec. It allows you to color, filter, make gradient, copy, paste, delete, erase, move, transform and so on in marquee.
Invert
Select the rest area after marquee tools select one area.
Move Tool
The move tool moves selection and it can also change the size of selection at will.
Draw a line in editing area, including toothed and smooth style.
After choosing line tool, you can master diameter and select fill option.
Note:
The smooth edge option will be default selected if the icon format is 32-bit. The option will be unavailable if the icon format is less than 32-bit.
After choosing pencil tool, the below options will appear in the option area of toolbox:
Master Diameter: Master the diameter of pencil directly.

Fill option: Select a fill style for pencil tool. Default fill color is foreground color.
After choosing brush tool, you can master diameter and select fill option.
Note:
The smooth edge option will be default selected if the icon format is 32-bit.
The option will be unavailable if the icon format is less than 32-bit.
To draw an empty rectangle in editing area. It allows you to draw the rectangle with gradient if you apply the gradient effect. You can also master diameter and select fill option.
To draw a filled rectangle in editing area. It allows you to draw the filled rectangle with gradient if you apply the gradient effect. You can also select fill option.
To draw an empty ellipse in editing area. It allows you to draw the ellipse with gradient if you apply the gradient effect. You can also master diameter and select fill option.
Note:
Smooth edge is unavailable if the icon format is less than 32-bit.
To draw a filled ellipse in editing area. It allows you to draw the filled ellipse with gradient if you apply the gradient effect. You can also select fill option.
Note:
Smooth edge is unavailable if the icon format is less than 32-bit.
Color picker tool is used to pick color in editing area and any color palette. After clicking, the current color value will be changed.
Paint Bucket Tool is used to fill the whole editing area or selected area with appointed color or gradient effect. It only provides you with fill option when you use paint bucket.
Eraser tools include Line Eraser, Brush Eraser, Rectangle Eraser, Filled Rectangle Eraser, Ellipse Eraser and Filled Ellipse Eraser.
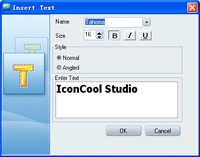
After selecting the text tool, there will be a text panel. Once there, enter any text and set the related parameters. To finish, press "OK". The text you entered will be shown in editing area, you can move the text to the appropriate place, and fill them with single color or gradient effect.
Draw a quadrate image with the 3D button effects. It is composed of two colors (foreground color and background color).
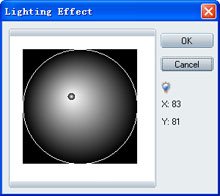
After clicking lighting effect tool, the lighting effect window will appear. You can see the effect you wanted in circle. You can also set various lighting effects by dragging the small circle. To finish, press "Ok".
Ani Editor
A frame editor for creating or editing animation cursors. You can convert current icons directly or make other graphics into the animation cursors by using the tool.
Capture Tool
To capture the area you want to get directly and rapidly. Click Capture icon to start capturing by left click on the mouse, then drag the marquee to select the size of the area.
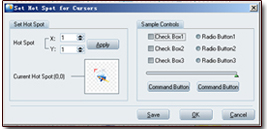
Set Hot Spot for
Cursors
Open "Set Hot Spot for Cursors" window, take current graphic as the mouse cursor. You can change the value of x and y to set hot spot for cursors. You can also test the hot spot by clicking on Sample Controls.
Icon Viewing
This function is an easy way to view your current edited icon before you want to finish your project. Click Tools menu-Icon Viewing or right click your mouse on one format icon in the icon format list. You can move this icon to any places you want put just by dragging mouse.
Foreground Color
and Background
Color
It enables you to select color by clicking the arrow on the foreground color or background color.
Change
Transparency
To adjust the transparency of foreground color or background color.
Grid
To show or hide a grid, choose View->Grid.
Zoom in
To magnify the size of editing area, choose View->Zoom in or click the "Zoom in" button in the options bar. When the editing area reaches its maximum magnification, the command is dimmed.
Zoom out
To reduce the size of editing area, choose View->Zoom out or click the "Zoom out" button in the options bar. When the editing area reaches its minimum magnification, the command is dimmed.
Fit on Screen
To fit an image to the screen, choose View > Fit on Screen or click the "Fit Size" icon in the toolbar.
Actual Pixels
To display an image at 100%, choose View > Actual Pixels or click "1:1" icon in the toolbar.
Note:
The 100% view of an image displays an image as it will appear in a browser (based on the monitor resolution and the image resolution).
Panel
To show or hide function panel, choose View->Panel.
Toolbox
To show or hide toolbox, choose View->Toolbox.
Icon Format List
To show or hide the multi-format icon list beneath the editing area, choose View-> Icon Format List.
Transform Menu displays the effects of two-dimensional transformation, using the commands of Shift, Align, Rotate and Flip to change the statuses of image.
Open Transform Menu: (1)Mouse cursor points at "Transform" then left click or
(2)Press Alt+R to expand transform menu.
Note:
All shortcut operations can be available as long as the underlined letter appears in the corresponding item while Transform menu is open. For example, when the Transform menu is open, you want practice the operating of Shift Left, just press "S" key to quickly finalize.
Align Left
Align image selected in editing area left.
Align Right
Align image selected in editing area right.
Align Top
Align image selected in editing area top.
Align Bottom
Align image selected in editing area bottom.
Align Horizontal
Centers
Align image selected in editing area horizontal centers.
Align Vertical
Centers
Align image selected in editing area vertical centers.
Shift Left
Shift the selected image to the left editing area.
Shift Right
Shift the selected image to the right editing area.
Shift Up
Shift the selected image to the up editing area.
Shift Down
Shift the selected image to the down editing area.
Rotate 90 Right
Rotate the entire image in editing area 90 degrees (clockwise).
If one area is selected, this function applies to only that area.
Rotate 90 Left
Rotate the entire image in editing area 90 degrees (anticlockwise).
If area is not selected, it will rotate entire image.
Rotate 180 (CW)
Rotate the entire image in editing area 180 degrees (clockwise).
If one area is selected, this function applies to only that area.
Rotate 270 (CW)
Rotate the entire image in editing area 270 degrees (clockwise).
If one area is selected, this function applies to only that area.
Flip Horizontal
Flip the entire image in editing area horizontal.
Flip Vertical
Flip the entire image in editing area vertical.
Filters Menu displays 6 categories: Color, Outline. Distort, Stylize, Buttonize, and 48 filters details.
Filters -> Color
Colorize
Change image hue, saturation and lightness. Upon selection, a filter dialog box will open. Drag the slider or enter color level data the boxes to vary the values of three of parameters such as Hue, Saturation and Lightness, then click OK to complete or Cancel to quit. meanwhile, selecting Preview can preview the image colorized.
Color Balance
You can change the hue of current icon easily by the filter tool. With this function, a filter dialog box opens. Drag the slider color level data to change the hue. If one area is selected, this function will be applied to only this area, otherwise the whole editing area.
Note:
After the operation, if the number of the colors you use is beyond the number permitted for current color depth, a prompt box will open.
Brightness & Contrast
IconCoolStudio6 can adjust brightness and contrast of the current icon. Improper light and dark image can employ this function. With this function, the filter dialog box pops-up. Drag the sliders to change the brightness or the contrast.
If one area is selected, this function will be applied to only this area, otherwise the whole editing area.
Note:
After the operation, if the number of the colors you use is beyond the number permitted for current color depth, a dialog box will open.
Tweak Gamma
Adjust gamma coefficient (combined contrast and brightness) of all color channels of current icon.
Grayscale
A grayscale image is simply one in which the only colors are shades of gray. In fact a `gray' color is one in which the red, green and blue components all have equal intensity in RGB space, and so it is only necessary to specify a single intensity value for each pixel, as opposed to the three intensities needed to specify each pixel in a full color image. With this function, it will convert the current icon to grayscale (256 shades of gray).
Swap Red Blue
Exchange the color channels of the current icon which includes the red color channel and blue channel.
Swap Green Blue
Exchange the color channels of the current icon which includes the green color channel and blue color channel.
Note:
All the exchanges can be specifically viewed by the RGB adjust gliders in the function panel on the right of the main interface.
Swap Red Green
Exchange the color channels of the current icon which includes the red color channel and green channel.
Filters -> Outline
In IconCool Studio, Outline focuses on the entire effects of the current icon, which will modify and adjust the edges by blurring, softening, sharpening and also the highlighted edge via High-Pass practiced.
Blur
Blur is a set of filters which can blur an image or parts it in different ways. This effect will get the impressive sense of the image which you desire for. The selection will be blurred in an image. IconCool Studio displays the blurry edge by doing the processing.You can drag the slider to change the blurring depth of the current icon.
Soften
Soften the edge of an image with much more mild and soft impression. Apply softening filter to the current icon.
Sharpen
Sharpen the current icon.
High-Pass
Apply high-pass filter to current icon.
Anti Alias
Apply anti-alias filter to current icon, whose effect is opposite to Sharpen.
Find Edges
Apply edge finding filter to detect easily the edges of current icon.
Mask Ellipse
Apply elliptical mask to current icon. Upon selection, a color dialog box will open. Make sure the mask color by selecting.
Filters -> Distort
Distort filters distort images to geometric effect images.
Ripple: Sine
Ripple: Tooth
Ripple : Random
Ripple : Triangle
These tools apply ripple filter to current icon. The degree of distortion is controlled by value of the "Depth" parameter.
Shake: UpDown
Shake : LeftRight
These tools apply special filter to current icon so that it looks like long exposure photo made with improperly stabilized camera.
The degree of distortion is adjusted by value of the "Depth" parameter.
Stretch: UpLeft
Stretch: UpRight
Stretch: DownLeft
Stretch: DownRight
These tools "stretch" current icon (without changing its dimensions) in the direction described by the filter name.
Wind Apply special effect to current icon. Result resembles effect of wind in horizontal direction.
Intensity of effect is controlled by the value of "Depth" parameter.
Swirl Distort current icon by twisting it around its center resembles effect of swirl.
Fish Eye Distort perspective of current icon so that it looks like a photograph taken with a "Fish Eye" lens (very short focal length).
Textured Glass Apply special filter to current icon. Result resembles image viewed through textured glass.
Filters -> Stylize
Emboss Emboss current icon.
Drag the slider to change the embossing depth of current icon.
If one area is selected, this function applies to only that area; otherwise the entire editing area.
Note:
After the operation, if the number of the colors you use is beyond the number permitted for current Color depth, a dialog box will open.
Emboss Color Emboss current icon.
Drag the slider to change the embossing depth of current icon.
If one area is selected, this function applies to only that area; otherwise the entire editing area.
Note:
After the operation, if the number of the colors you use is beyond the number permitted for current color depth, a dialog box will open.
Enhance Edge Apply special filter to current icon. The result can be described as color embossing.
Diffuse Apply diffusion effect to current icon. Drag the slider to change the diffusion depth.
If one area is selected, this function applies to only that area; otherwise the entire editing area.
Note:
After the operation, if the number of the colors you use is beyond the number permitted for current color depth, a dialog box will open.
Posterize Apply filter reducing number of bits per color channel in current icon.
Neontrace Apply special contour-tracing filter to current icon.
Solarize Solarize current icon. The size of the solarized area is related to the size of the pen.
Negative Invert current icon. Replaces each color in current icon with its opposite color. Drag the slider to change the inversion depth.
Filters -> Buttonize
Buttonize: Smooth Applies transparent bevel to image edges.
Buttonize: Simple Applies solid bevel to image edges.
Buttonize: Ellipse1
Buttonize: Ellipse2
Buttonize: Ellipse3
These tools create button-like elliptic shape inside current icon.
Its appearance is determined by the values of "Depth" and "Weight" parameters.
Tile1
Apply special filter to current icon. Result is an image composed of small tiles being copies of original. Intensity of the effect is controlled by the value of "Depth" parameter.
Tile2
Apply special filter to current icon. Result is an image composed of small tiles being copies of original. The effect intensity is controlled by the value of "Depth" parameter.
Mosaic
Make current icon appear to be built of rectangles of dimensions given by values of "width" and "height" parameters.
Add Noise Add noise to current icon. If "Monochromatic" parameter is "True", the noise is monochromatic, otherwise color.
Reflect Left Right
Reflect left part of current icon (making it symmetrical about its central vertical line).
Reflect Up Down
Reflect top part of current icon (making it symmetrical about its central horizontal line).
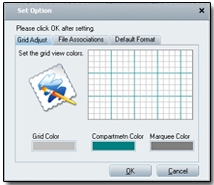
Grid Adjust
To choose "Options-->Grid Adjust", the "Set Option" window will pop up, you can adjust the grid color, compartment color and marquee color as you want.
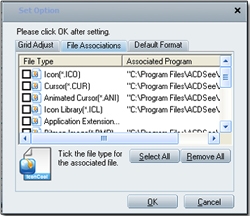
File Associations
To choose "Options-->File Associations", the "Set Option" window will pop up, it enables you to set the file type associated with IconCool Studio. You can also cancel the associations at any time. If you want to cancel the association of any format, you just need to unselect the combo box in formats list. You can open the file format associated with IconCool Studio by the following ways: 1. Double-click on a file in Explorer. 2. Right-click on a file, then choose menu "Open with IconCool Studio".
Default Format
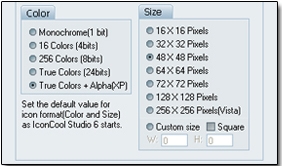
To choose "Options-->Default Format", the "Set Option" window will pop up, you can set the default value for icon format, including color and size as IconCool Studio starts.
IconCool Studio provides you with the following paths to arrange editing windows when you open several projects:
Cascade, Tile, Rearrange all, Minimize all.
IconCool Online
IconCool Homepage
Enter www.iconcool.com
Graphics Convert Pro
Enter the Graphics Convert Pro website.
My Buddy Icons
Enter the My Buddy Icons website.
MP3 WAV Studio
Enter the MP3 WAV Studio website.
Icons Online
Enter the Icons Online website.
Customer Service
Support Center
Visit our support center.
Bug Report and Feedback
Submit bug report and feedback online.
FAQ Page
Visit our FAQ web page.
Order Online Now
Order IconCool Studio 5 online.
Registration
Open "Registration" window to look for the related registration information. If you are using full-working version, you can enter registration name (email) and registration code to finish the registration.
Other Products
A brief introduction for other IconCool software.
Icons-online.com
Visit www.icons-online.com.
About
IconCool Software version and other related information.
Function Panel
Function Panel contains the major processing effects such as Information Palette, color mixer, swathes, gradient, transform and filters. It enables you simply and swiftly to realize the processing which you want to carry out.
Information Palette
Welcome
Click Welcome button to display the welcome information, a brief guidance of IconCool Studio as follows: Open existing project; Creat new project; Visit IconCool Home.
To view the icon you are drawing in the editing area also can get in the preview window. It presents the real size of the picture you are creating in accordance with the previous specified format from 16*16 pixels to 128*128 pixels which can also be viewed in the View Menu by selecting Actual Pixels. However, 256*256 pixels size just can be showed in the 50% size. To view original 256*256 pixels image needs to choose the formats in the status bar beneath the editing area. In addition, preview window bears four quick such performances as Set Background Color, Set Background Picture, Set Default Background, Save with Three States. IconCool Studio provides three icon states to save: Grayscale, Current Pick and Lighter. By clicking the gray triangle beside Preview button will reach these performances as previous. All these four definitions can be saved automatically and will be opened automatically next starting project.
In IconCool Studio, Color Mixer refers to a comprehensive color management panel which includes Color, Swatches and Gradient.
Color
Foreground Color and Background Color setting and adjusting:
It enables you to define the foreground color and background color, and you can also switch the current colors between foreground color and the background color and restore to black and white.
Do as follows to realize desired color:
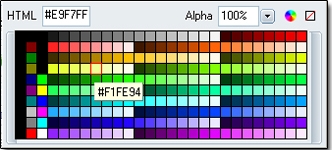
Click Color button to pop up color panel to set foreground color and background color. For example, click the foreground color area to appear the color palette, and then pick the desired color by eyedropper.
(1) To adjust the opacity of the desired color by dragging the green triangle beneath the Adjust Opacity glide bar which ranges from 0% to 100%, the bigger the percentage number is, the less transparent the image is.
(2) To adjust the saturation of foreground color and background color can drag the green triangle beneath the Adjust Saturation glide bar which indicates the depth of the color from white to the full value.
(3) Three methods for changing color:
◆Click "Swatches", there will be a color panel; you can set the color value of the selected swatch.
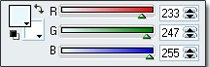
◆You can adjust RGB value directly, then adjust the Alpha value or set the white as the selected color in glide bar.
◆Select the appointed color by clicking the color stripe.
Swatches
Swatches, as a matter of fact, is a color palette to display all the colors in terms of four color modes of CMYK, MAC_OS, RGB, Windows.
Click "Swatches" in color palette and select the corresponding color.
It offers you four options for color palette: CMYK, MAC_OS, RGB, Windows. Default is RGB color palette. Four tools to edit the color you want:
Invert Colors: To change current image color to its inverse color, please click the Invert Color button, and then the current image color will be converted to its inverse color.
Open: Open the existing color you saved before.
Save: Save the color you are selecting.
Add: Add one new color you desire for.
Delete: Delete one existing color.
Reset: Recover system swatches.
Gradient
In IconCool Studio, the Gradient panel offers 6 types of gradient samples, supporting two colors’ gradient effects, which are Solid, Vertical Gradient, Horizontal Gradient, Diamond Gradient, Angle Gradient, and Radial Gradient. You can also freely add or delete different gradients on the basis of these 6 samples between two colors.
(1) To add a gradient: Click the to appear the "Add Gradient" window. Firstly, select two colors in Color box; secondly, adjust the Alpha channel to get the desired transparency; thirdly, select one item of gradients from the 6 samples; fourthly, define the proportion of the two colors’ gradient degree via dragging the two stops beneath the gradient glide bar. Finally, click these options to get corresponding performance: Apply, Save or Cancel.
(2) To delete one existing gradient, just select the gradient in the gradient editing area and then click the to complete.
(3) To utilize gradients to create an icon, you can choose one of the gradient samples from the existing gradients (includes gradient samples and customized gradients) then drawing tools from the toolbox locating the left of the window to finish.
In IconCool Studio, the transform panel offers some quick and common used transforming functions and filters which maybe overlap the Transform menu and Filters menu.
Rotate:
(1) Shift: Click these four arrows to shift the whole drawing icon to four directions: Up, Down, Left and Right.
(2) Align: firstly, click the marquee tools to define the selection desired and click Move tool to make sure the selection to be aligned. The align icons will change from the original gray color to light blue so that you can employ them directly.
(3) Rotate: To rotate the whole icon or the selected area can be realized by clicking the rotate icons or adjusting the rotating angles of 90,180 or 270.
(4) Flip: two flips are provided as Flip Vertical and Flip Horizontal.
(5) Adjust Opacity: A convenient glide bar displays to adjust opacity of the currently drawing icon.


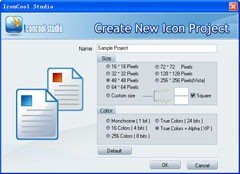
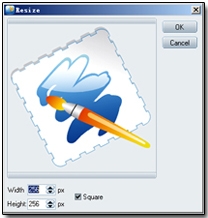
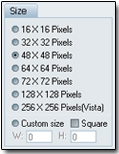
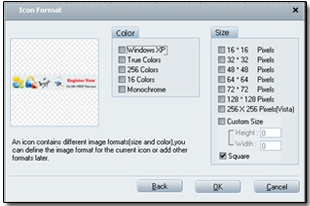
 in toolbar or press Ctrl+N , the "Create New Icon Project' window appears, you can enter the project name in the box; choose the icon size from these options including 16*16 Pixels, 24*24 Pixels, 32*32 Pixels, 48*48 Pixels, 64*64 Pixels, 72*72 Pixels, 96*96 Pixels, 128*128 Pixels, 256*256 Pixels or custom size by yourself. When customizing, set the value for width and height, if the box of "square" is selected, the two values will be the same.
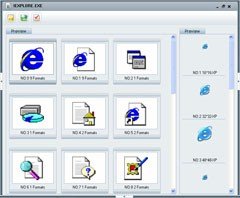
 in toolbar or press Ctrl +O, the "Open Files" dialog box appears, you can open any files supported by IconCool Studio,such as *.ICO, *.CUR, *.ICL, *.EXE and *. DLL, the ICO and CUR file can be opened in editing area directly. If the file you opened is multi-format (such as ICL, EXE, DLL), there will be an icon format window for choosing.


 in toolbar or press Ctrl+S, the "Save as" dialog box appears, you can appoint the file name and save path by yourself, and then click "Save" button to finish.